Hello all,
I felt that it would be really cool to have more complex looking 3D scenes running in Codea, and working with blender is pretty easy so well…
edit: I’ve rewritten the exporter a while ago, but updates to this post have been lacking. This is now a fully functional version
You can find the latest exporter on my website here
It will take a mesh and export it to an image, like this one:

This really makes it much more usable to use and share than having huge text files in your codea project.
Unfortunately, I can only use RGB to encode the data, using the alpha channel makes it unusable in Codea due to the way textures are loaded onto a surface). this means the output file is slightly larger
Vertices, vertices colors, normals and UVs (texture coordinates) are exported.
Simple textured monkey example:

Anyway, it’s simple enough to use, create your pretty scene, hit export and you get an image ready to import into blender.
Usage is pretty simple (this is normally part of a class used in my upcoming project, but I cleaned it up to be functions).
Here are the images used in the following example: http://ezakirth.free.fr/files/
and 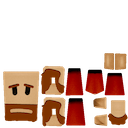
--# Main
function setup()
    mdl = Model("Dropbox:model", "Dropbox:texture")

    useShader = false
    if useShader then
        mdl.shader.light = vec3(0,0,100):normalize()
    end
    ang = 0
end

function draw()
    background(0)

    perspective(60)
    local x = math.sin(ang)*5
    local y = math.cos(ang)*5
    local z = math.cos(ang)*5
    camera(x, y, z, 0, 0, 0, 0, 0, 1)

    mdl:draw()

    ang = ang + (math.pi/180)
end


--# Model
function Model(mdl, texture)
    local img = readImage(mdl)
    local width, height = spriteSize(mdl)

    local verts = {}
    local normals = {}
    local colors = {}
    local coords = {}

    local a1, b1, c1, d1, a2, b2, c2, d2, a3, b3, c3, d3, x, y, z, X, Y, n, size
    local strToChar = string.char
    local ins = table.insert

    cnt = 0
    X = 1
    Y = height

    n = 1
    a1, b1, c1 = img:get(X,Y)
    X, Y = nextPixel(X, Y, width)
    d1 = img:get(X,Y)
    X, Y = nextPixel(X, Y, width)
    size = bytesToFloat(strToChar(a1, b1, c1, d1))

    cnt = 0
-- vertices
    while n<=size do
        a1, b1, c1 = img:get(X,Y)
        X, Y = nextPixel(X, Y, width)

        d1, a2, b2 = img:get(X,Y)
        X, Y = nextPixel(X, Y, width)

        c2, d2, a3 = img:get(X,Y)
        X, Y = nextPixel(X, Y, width)

        b3, c3, d3 = img:get(X,Y)
        X, Y = nextPixel(X, Y, width)

        x = bytesToFloat(strToChar(a1, b1, c1, d1))
        y = bytesToFloat(strToChar(a2, b2, c2, d2))
        z = bytesToFloat(strToChar(a3, b3, c3, d3))

        ins(verts, vec3(x, y, z))
        n = n + 1
    end
    print(cnt.." for "..size.." vertices")
    cnt = 0
-- normals
    n = 1
    while n<=size do
        a1, b1, c1 = img:get(X,Y)
        X, Y = nextPixel(X, Y, width)

        d1, a2, b2 = img:get(X,Y)
        X, Y = nextPixel(X, Y, width)

        c2, d2, a3 = img:get(X,Y)
        X, Y = nextPixel(X, Y, width)

        b3, c3, d3 = img:get(X,Y)
        X, Y = nextPixel(X, Y, width)

        x = bytesToFloat(strToChar(a1, b1, c1, d1))
        y = bytesToFloat(strToChar(a2, b2, c2, d2))
        z = bytesToFloat(strToChar(a3, b3, c3, d3))

        ins(normals, vec3(x, y, z))
        n = n + 1
    end
    print(cnt.." for "..size.." normals")
    cnt = 0
-- colors
    n = 1
    while n<=size do
        a1, b1, c1 = img:get(X,Y)
        X, Y = nextPixel(X, Y, width)

        d1, a2, b2 = img:get(X,Y)
        X, Y = nextPixel(X, Y, width)

        c2, d2, a3 = img:get(X,Y)
        X, Y = nextPixel(X, Y, width)

        b3, c3, d3 = img:get(X,Y)
        X, Y = nextPixel(X, Y, width)

        x = bytesToFloat(strToChar(a1, b1, c1, d1))*255
        y = bytesToFloat(strToChar(a2, b2, c2, d2))*255
        z = bytesToFloat(strToChar(a3, b3, c3, d3))*255


        ins(colors, color(x, y, z, 255))
        n = n + 1
    end
    print(cnt.." for "..size.." colors")
    cnt = 0

-- texture coordinates
    if texture then
        n = 1
        while n<=size do
            a1, b1, c1 = img:get(X,Y)
            X, Y = nextPixel(X, Y, width)

            d1, a2, b2 = img:get(X,Y)
            X, Y = nextPixel(X, Y, width)

            c2, d2, a3 = img:get(X,Y)
            X, Y = nextPixel(X, Y, width)

            x = bytesToFloat(strToChar(a1, b1, c1, d1))
            y = bytesToFloat(strToChar(a2, b2, c2, d2))

            ins(coords, vec2(x,y))
            n = n + 1
        end
    end

    local total = 3*(size*4)+(size*3)+2
    print(cnt.." for "..size.." texture coords")
    print("total:"..total.." pixels, for a model of "..(size/3).." polygons")

    local min = math.ceil(math.sqrt(total))
    print("min img size:"..min.."x"..min)
    cnt = 0

    local data = mesh()
    data.vertices = verts
    data.colors = colors
    data.normals = normals

    if texture then
        data.texture = texture
        data.texCoords = coords
        if useShader then
            data.shader = shader("Documents:cellShadingTextured")
        end
    else
        if useShader then
            data.shader = shader("Documents:cellShading")
        end
    end

    verts = nil
    coords = nil
    colors = nil
    normals = nil
    img = nil

    return data
end


-- Converts a string of 4 bytes to a float
function bytesToFloat(x)
    local byte = string.byte
    local ldexp = math.ldexp
    local sign = 1
    local mantissa = byte(x, 3) % 128
    for i = 2, 1, -1 do
        mantissa = mantissa * 256 + byte(x, i)
    end
    if byte(x, 4) > 127 then
        sign = -1
    end
    local exponent = (byte(x, 4) % 128) * 2 + math.floor(byte(x, 3) / 128)
    if exponent == 0 then
        return 0
    end
    mantissa = (ldexp(mantissa, -23) + 1) * sign
    return ldexp(mantissa, exponent - 127)
end

-- Goes to next available pixel
function nextPixel(x, y, max)
    cnt = cnt + 1
    x = x + 1
    if x>max then
        x = 1
        y = y - 1
    end
    return x, y
end
Cheers,
Xavier